記事公開日
最終更新日
【Copilot for Microsoft 365】Copilot拡張プラグインを作成してみた!⑤
本記事では、Copilot for Microsoft 365の拡張プラグインを作成します。
今回は、第5回目となります。
これまでの記事については以下リンクをご参照ください。
【Copilot for Microsoft 365】Copilot拡張プラグインを作成してみた!①
【Copilot for Microsoft 365】Copilot拡張プラグインを作成してみた!②
【Copilot for Microsoft 365】Copilot拡張プラグインを作成してみた!③
【Copilot for Microsoft 365】Copilot拡張プラグインを作成してみた!④
前回の記事では「Azure AI Search」に接続しましたが、今回は「Microsoft Graph API」を使用して実際に検索やデータの更新も実装してみます。
実装は、サンプルページをもとに、Microsoft Graph を介して SharePoint Online チーム サイトの製品リストを照会・更新を試してみます。
SharePoint Online サイトの準備
まずは、製品サポートSharePoint Online チーム サイトを準備していきたいと思います。
サンプルよりテンプレートが提供されていますので、PnP PowerShell を使い SharePoint Online にチームサイトを作成していきます。
手順はサンプルページの「1.Prepare SharePoint Online」に沿って進めていきます。
注意点として、PnP PowerShell 最新モジュール(現時点バージョン[2.10.0])は PowerShell 7.2 以降に対応しているので、PowerShell 5系をお使いの場合は、バージョン[1.12.0]を使用してください。
また、SharePoint Online の管理サイトに接続するので、接続するアカウントに役割の割り当てで[SharePoint 管理者]を付与することと、PnP PowerShell モジュールが Azure にアクセスするためのエンタープライズアプリ「PnP Management Shell」を作成するRegister-PnPManagementShellAccess コマンドレットを実行する必要があります。
手順通りに進めると、下記のチームサイトが作成されます。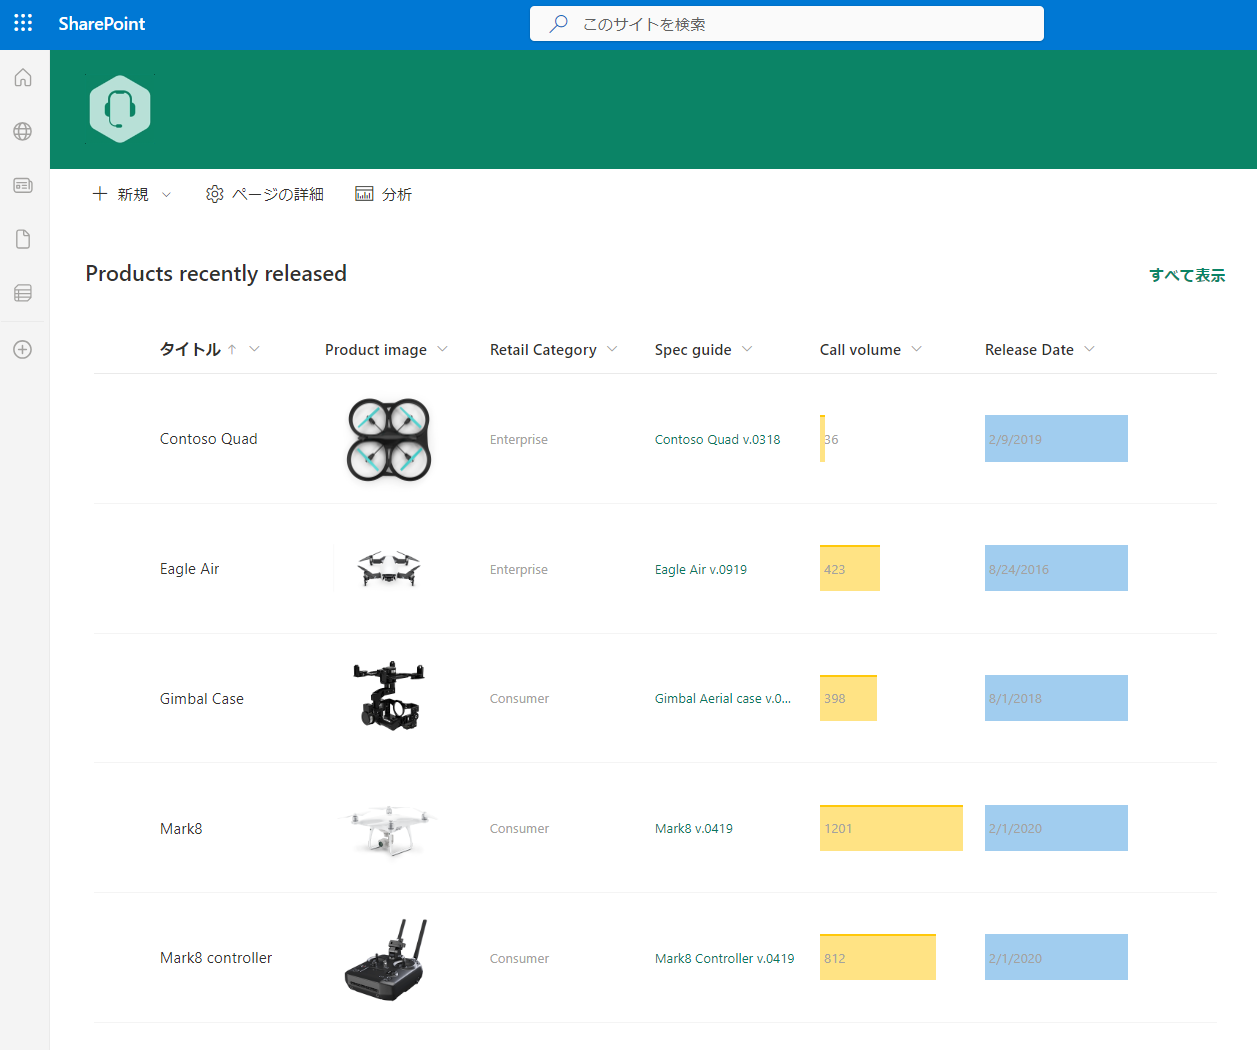
プロジェクトの準備
手順はサンプルページの「2.Prepare and run project」に沿って進めていきます。
開発トンネルの作成の仕方や、Teams ツールキットの使用方法については「【Copilot for Microsoft 365】Copilot拡張プラグインを作成してみた!①」に記載しておりますので、そちらをご確認ください。
「Teams アプリの依存関係を準備する」を実行すると、.env.local lanchSetting.json に Azure AI Bot Service をプロビジョニングするのに必要な情報が展開されます。
プロビジョニングが完了するとテナントには下記が作成されていることが確認できます。
- リソース グループ:TestRG
- Azure ボット:bot-<ランダムな文字列>-local
- アプリケーション登録:msgext-product-support-sso-csharp-bot-local
- エンタープライズアプリ:msgext-product-support-sso-csharp-graph-local
- Teams アプリ:Contoso products ※アプリは Teams 用開発ポータルで確認できます。
Microsoft Graph の実装
Visual Studio の プロジェクト テンプレート「Microsoft Teams アプリ」から、さらに Microsoft Graph で接続するために下記 NuGet モジュールを追加することが必要となります。
- Azure.Identity
- Microsoft.Graph
- Microsoft.Graph.Core
- Microsoft.Kiota.Abstractions
- Microsoft.Kiota.Authentication.Azure
- Microsoft.Kiota.Http.HttpClientLibrary
- Microsoft.Kiota.Serialization.Form
- Microsoft.Kiota.Serialization.Json
- Microsoft.Kiota.Serialization.Multipart
- Microsoft.Kiota.Serialization.Text
さっそく、実装を見ていきましょう。
Azure AI Bot Service で設定しているメッセージング エンドポイントを通じて OnTeamsMessagingExtensionQueryAsync メソッド が呼び出されます。
protected override async Task OnTeamsMessagingExtensionQueryAsync(ITurnContext turnContext, MessagingExtensionQuery query, CancellationToken cancellationToken)
{
    // see if we have a token for the user
    var userTokenClient = turnContext.TurnState.Get();
    var tokenResponse = await GetToken(userTokenClient, query.State, turnContext.Activity.From.Id, turnContext.Activity.ChannelId, connectionName, cancellationToken);

    // check to see if a token was returned from the token service
    if (!HasToken(tokenResponse))
    {
        // no token returned so ask the user to sign in and consent to the required permissions
        return await CreateAuthResponse(userTokenClient, connectionName, (Activity)turnContext.Activity, cancellationToken);
    }

    // get the query parameter values
    var initialRun = GetQueryData(query.Parameters, "initialRun");
    var name = GetQueryData(query.Parameters, "ProductName");
    var retailCategory = GetQueryData(query.Parameters, "TargetAudience");

    Debug.WriteLine($"🔍 Is initial run?: {!string.IsNullOrEmpty(initialRun)}");
    Debug.WriteLine($"🔍 Name: '{name}'");
    Debug.WriteLine($"🔍 Retail category: '{retailCategory}'");

    // define filters to be used when querying SharePoint
    var nameFilter = !string.IsNullOrEmpty(name) ? $"startswith(fields/Title, '{name}')" : string.Empty;
    var retailCategoryFilter = !string.IsNullOrEmpty(retailCategory) ? $"fields/RetailCategory eq '{retailCategory}'" : string.Empty;
    var filters = new List { nameFilter, retailCategoryFilter };

    // remove any empty filters
    filters.RemoveAll(string.IsNullOrEmpty);

    // create the filter string to be used when querying SharePoint
    var filterQuery = filters.Count == 1 ? filters.FirstOrDefault() : string.Join(" and ", filters);
    Debug.WriteLine($"🔍 Filter query: {filterQuery}");

    // create a Graph client
    var graphClient = CreateGraphClient(tokenResponse);

    // get the Product Marketing site and Product items
    var site = await GetSharePointSite(graphClient, spoHostname, spoSiteUrl, cancellationToken);
    var items = await GetProducts(graphClient, site.SharepointIds.SiteId, filterQuery, cancellationToken);

    // create the adaptive card template
    var adaptiveCardJson = File.ReadAllText(@"AdaptiveCards\Product.json");
    var template = new AdaptiveCardTemplate(adaptiveCardJson);

    // get the Product Imagery drive to get the images for the Product
    var drive = await GetSharePointDrive(graphClient, site.SharepointIds.SiteId, "Product Imagery", cancellationToken);

    // create an an array of attachments to be sent in the response
    var attachments = new List();

    // iterate through the Product items
    foreach (var item in items.Value)
    {
        // deserialize the JSON into a Product object
        var product = JsonConvert.DeserializeObject(item.AdditionalData["fields"].ToString());
        product.Id = item.Id;

        // get the Thumbnail images the Product
        ThumbnailSet thumbnails = await GetThumbnails(graphClient, drive.Id, product.PhotoSubmission, cancellationToken);

        // render the adaptive card using template
        // shown in the message when the user selects a product in Teams UI or
        // shown as a preview when the user hovers over a reference to the product in Copilot messages
        var resultCard = template.Expand(new
        {
            Product = product,
            ProductImage = thumbnails.Large.Url,
            SPOHostname = spoHostname,
            SPOSiteUrl = spoSiteUrl,
        });

        // create the preview card
        // shown in the search results in Teams UI
        // shown in the references section of Copilot messages
        var previewcard = new ThumbnailCard
        {
            Title = product.Title,
            Subtitle = product.RetailCategory,
            Images = [new() { Url = thumbnails.Small.Url }]
        }.ToAttachment();

        // create the attachment to be sent in the response using the adaptive card and preview card
        var attachment = new MessagingExtensionAttachment
        {
            Content = JsonConvert.DeserializeObject(resultCard),
            ContentType = AdaptiveCard.ContentType,
            Preview = previewcard
        };

        attachments.Add(attachment);
    }

    return new MessagingExtensionResponse
    {
        ComposeExtension = new MessagingExtensionResult
        {
            Type = "result",
            AttachmentLayout = "list",
            Attachments = attachments
        }
    };
}
ログイン フロー内のユーザーのトークンを取得する GetUserTokenAsync メソッドは、下記 GetToken メソッド 内に実装されています。
private static async Task GetToken(UserTokenClient userTokenClient, string state, string userId, string channelId, string connectionName, CancellationToken cancellationToken)
{
    var magicCode = string.Empty;

    if (!string.IsNullOrEmpty(state))
    {
        if (int.TryParse(state, out var parsed))
        {
            magicCode = parsed.ToString();
        }
    }

    return await userTokenClient.GetUserTokenAsync(userId, connectionName, channelId, magicCode, cancellationToken);
}
Microsoft Graph で操作するための、Microsoft Graph クライアントは、下記 CreateGraphClientメソッド内の GraphServiceClient メソッドで実装されています。
private static GraphServiceClient CreateGraphClient(TokenResponse tokenResponse)
{
    TokenProvider provider = new() { Token = tokenResponse.Token };
    var authenticationProvider = new BaseBearerTokenAuthenticationProvider(provider);
    var graphClient = new GraphServiceClient(authenticationProvider);
    return graphClient;
}

private static async Task GetSharePointSite(GraphServiceClient graphClient, string hostName, string siteUrl, CancellationToken cancellationToken)
{
    return await graphClient.Sites[$"{hostName}:/{siteUrl}"].GetAsync(r => r.QueryParameters.Select = ["sharePointIds"], cancellationToken);
}
上記のMicrosoft Graph クライアントを使用して、SharePoint から下記のように情報が取得できます。
private static async Task GetSharePointSite(GraphServiceClient graphClient, string hostName, string siteUrl, CancellationToken cancellationToken)
{
    return await graphClient.Sites[$"{hostName}:/{siteUrl}"].GetAsync(r => r.QueryParameters.Select = ["sharePointIds"], cancellationToken);
}

private static async Task GetProducts(GraphServiceClient graphClient, string siteId, string filterQuery, CancellationToken cancellationToken)
{
    var fields = new string[]
    {
        "fields/Id",
        "fields/Title",
        "fields/RetailCategory",
        "fields/PhotoSubmission",
        "fields/CustomerRating",
        "fields/ReleaseDate"
    };

    var requestUrl = string.IsNullOrEmpty(filterQuery)
        ? $"https://graph.microsoft.com/v1.0/sites/{siteId}/lists/Products/items?expand={string.Join(",", fields)}"
        : $"https://graph.microsoft.com/v1.0/sites/{siteId}/lists/Products/items?expand={string.Join(",", fields)}&$filter={filterQuery}";

    Debug.WriteLine($"🔍 Request URL: {requestUrl}");
    var request = graphClient.Sites.WithUrl(requestUrl);
    return await request.GetAsync(null, cancellationToken);
}
実行してみる
手順はサンプルページの「3.Test in Copilot」に沿って進めていきます。
手順を進めて「Find Contoso products aimed at individuals」と Copilot に入力してみると下記のようなレスポンスが確認されます。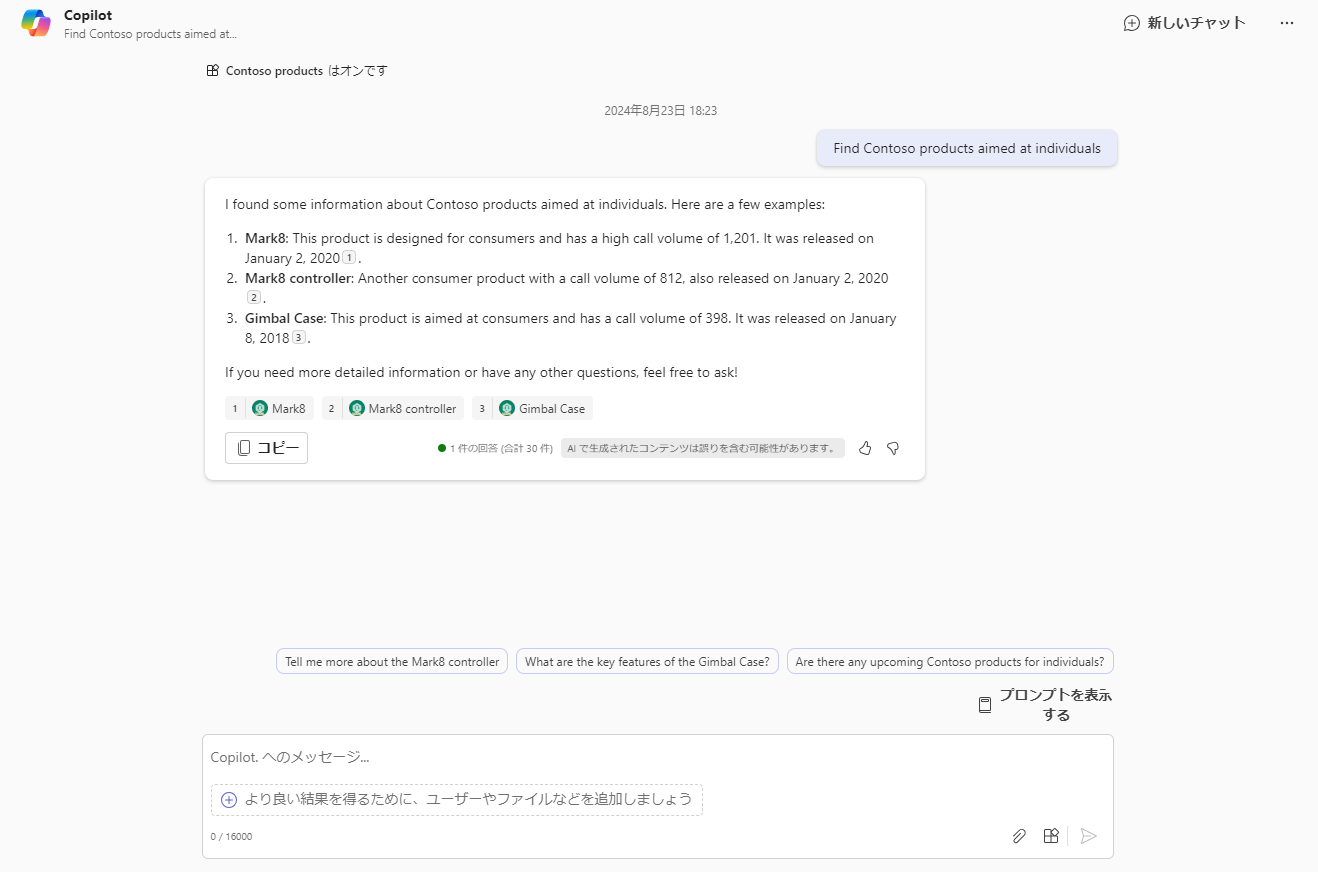
アダプティブカードを開いてみます。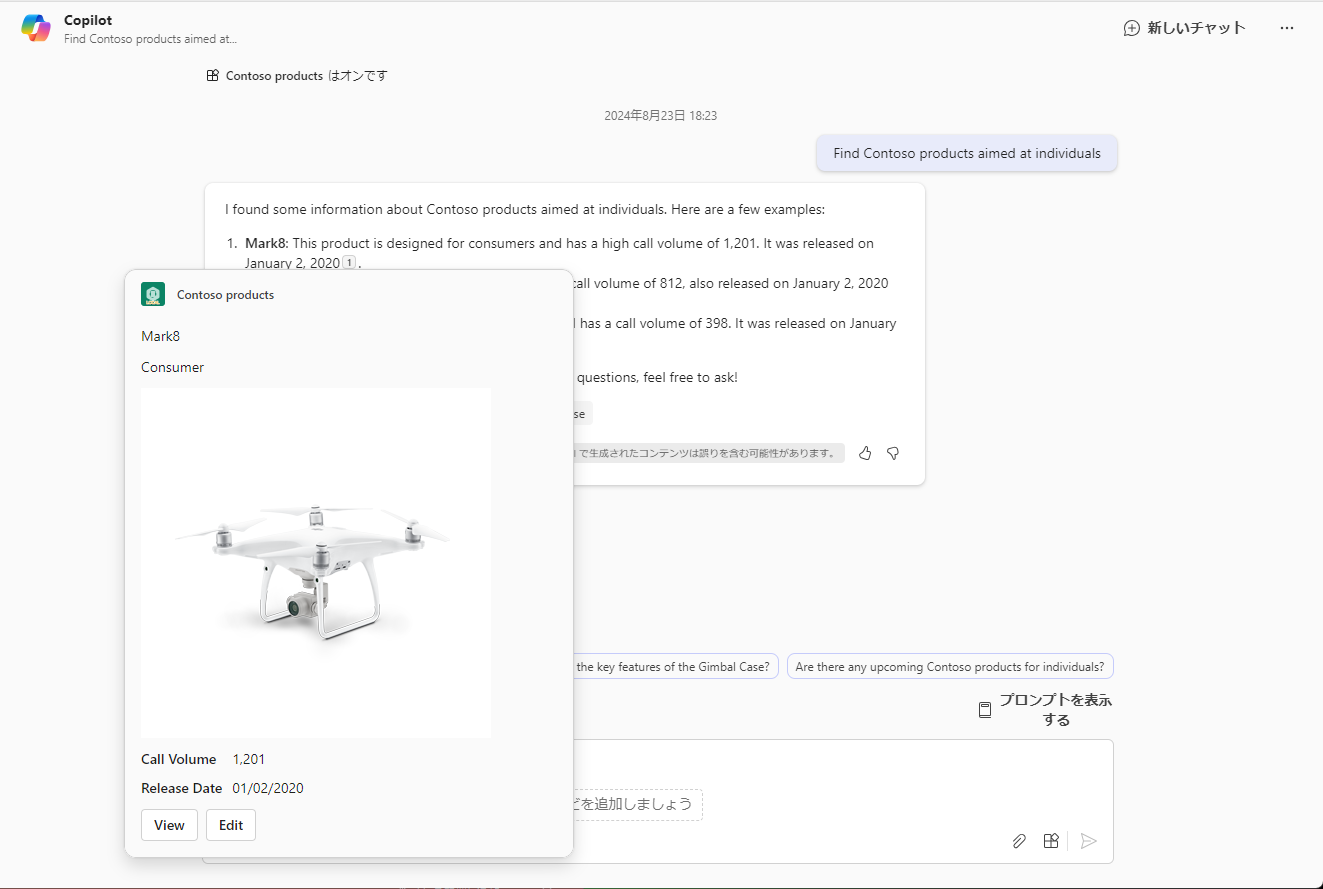
Edit ボタンを押下すると下記のアダプティブカードが表示されます。
Release Date の値を編集して Save ボタンを押下すると 無事 SharePoint サイトが更新されました。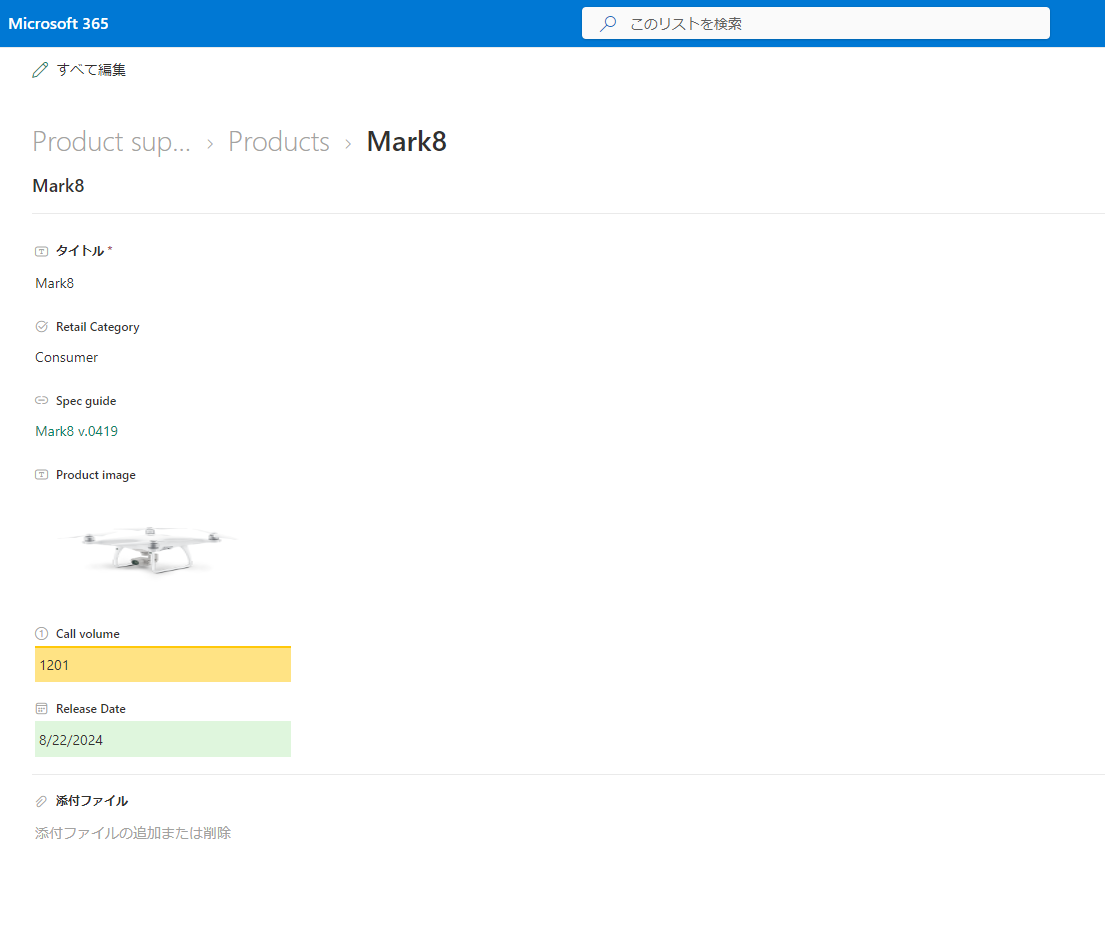
上記では英語で検索しましたが、日本語でも試してみました。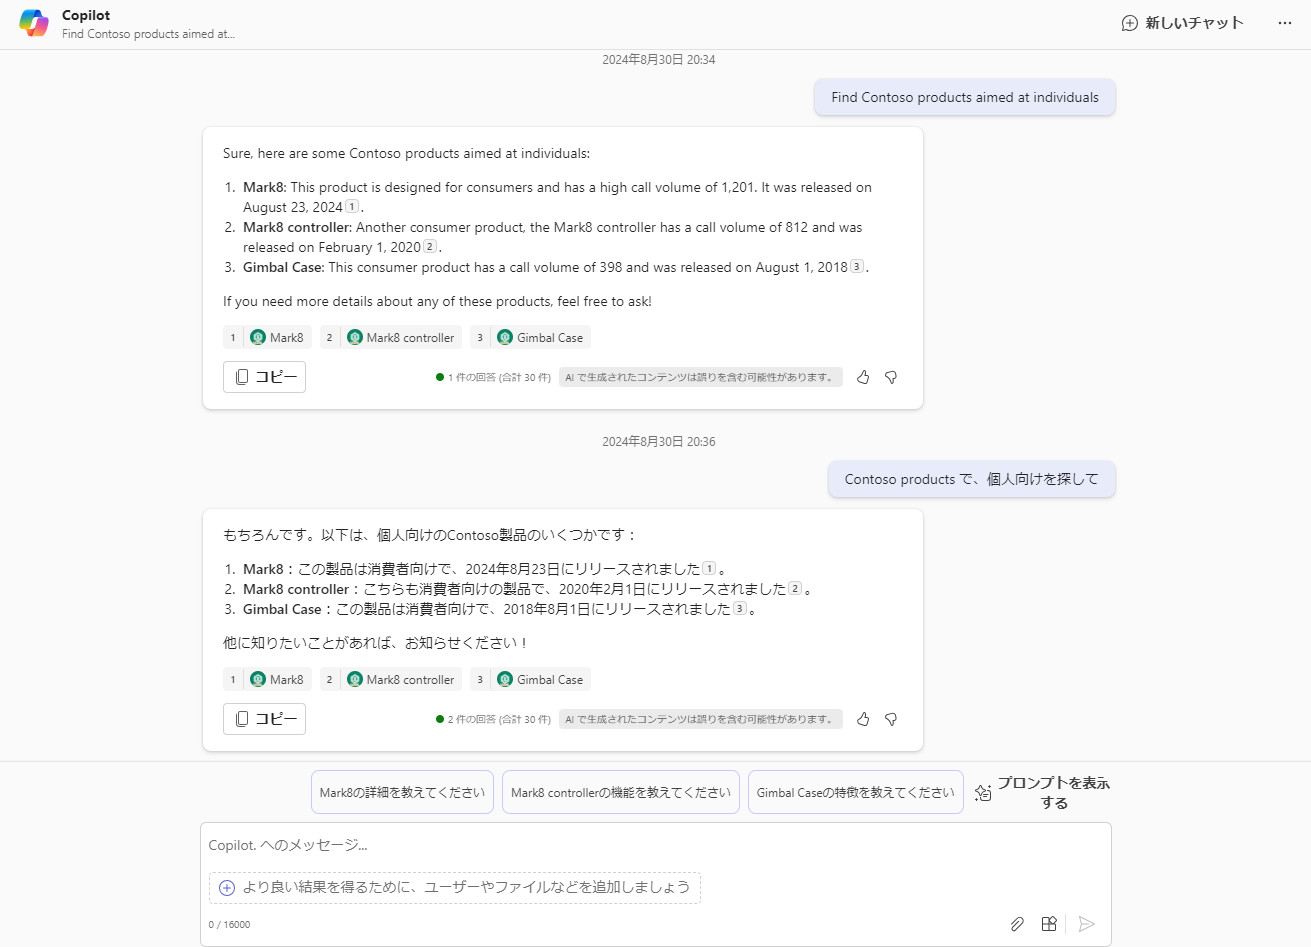 無事、Copilot が日本語のプロンプトも理解してくれたみたいです。
まとめ
いかがだったでしょうか。
今回は、Microsoft Graph API を使って、SharePoint Online に連携してみました。SharePoint Online 他にも 同様な方式で M365 のサービス を操作することができます。アイデア次第で、いろいろなシーンで活用できるかと思いますので参考にしてみてください。
また、Copilot for Microsoft 365 の具体的な活用方法等のブログもたくさんありますのでご覧ください!
QUICK E-Solutionsでは、「AIチャットボット構築サービス」をはじめとして、各AIサービスを利用したシステム導入のお手伝いをしております。それ以外でも QESでは様々なアプリケーションの開発・導入を行っております。提供するサービス・ソリューションにつきましては こちら に掲載しております。
システム開発・構築でお困りの問題や弊社が提供するサービス・ソリューションにご興味を抱かれましたら、是非一度 お問い合わせ ください。
※このブログで参照されている、Microsoft、Microsoft 365、Microsoft Copilot for Microsoft 365、Microsoft Teams、Azure OpenAI、その他のマイクロソフト製品およびサービスは、米国およびその他の国におけるマイクロソフトの商標または登録商標です。
※その他の会社名、製品名は各社の登録商標または商標です。